Here it is:
It’s also available via Winget: winget install "Lenovo System Update"
Here it is:
It’s also available via Winget: winget install "Lenovo System Update"
It’s built into the latest builds of Windows 10 and 11 and Server, and can be installed into many.
To see if you have it, try winget from CMD or Powershell. If you don’t have it on a newer platform with the Microsoft store, here’s the link:
learn.microsoft.com/en-us/windows/package-manager/winget/
One good way to try it, is to install Microsoft .NET framework (SDK) 6, thus, from administrative Powershell:
winget install --id Microsoft.DotNet.Runtime.6 --silent --accept-source-agreements
I learned just now that if you add other seemingly valuable options to the one above, e.g., --scope machine, at least while running as SYSTEM, it will fail citing package not found. So you’ll want to test carefully.
Here’s one proven just now for 7zip (there’s a “search” option in winget to get the ID):
winget install --exact --id 7zip.7zip --accept-package-agreements --silent --scope machine
Here’s one for Google Chrome, needs a bit of extra:
winget.exe install --exact --id Google.Chrome --silent --accept-package-agreements --accept-source-agreements --scope machine
If you do want to use it from the SYSTEM account, in scripting, it gets interesting. You’ll want to first run this:
$ResolveWingetPath = Resolve-Path "C:\Program Files\WindowsApps\Microsoft.DesktopAppInstaller_*_x64__8wekyb3d8bbwe"
    if ($ResolveWingetPath){
           $WingetPath = $ResolveWingetPath[-1].Path
    }
$ENV:PATH += ";$WingetPath"
and then winget will run as expected.
Adding Winget on Windows 10/2019/2016 builds 1809 or lower is touch and go. This worked on a recent Server 2019/1809, with the addition to the path above:
# Install VCLibs
Add-AppxPackage 'https://aka.ms/Microsoft.VCLibs.x64.14.00.Desktop.appx'

# Install Microsoft.UI.Xaml.2.7.3 from NuGet
Invoke-WebRequest -Uri https://www.nuget.org/api/v2/package/Microsoft.UI.Xaml/2.7.3 -OutFile .\microsoft.ui.xaml.2.7.3.zip
Expand-Archive .\microsoft.ui.xaml.2.7.3.zip
Add-AppxPackage .\microsoft.ui.xaml.2.7.3\tools\AppX\x64\Release\Microsoft.UI.Xaml.2.7.appx

# Install the latest release of Microsoft.DesktopInstaller from GitHub
Invoke-WebRequest -Uri https://github.com/microsoft/winget-cli/releases/latest/download/Microsoft.DesktopAppInstaller_8wekyb3d8bbwe.msixbundle -OutFile .\Microsoft.DesktopAppInstaller_8wekyb3d8bbwe.msixbundle
Add-AppxPackage .\Microsoft.DesktopAppInstaller_8wekyb3d8bbwe.msixbundle

# Fix permissions
TAKEOWN /F "C:\Program Files\WindowsApps" /R /A /D Y
ICACLS "C:\Program Files\WindowsApps" /grant Administrators:F /T
Lots of interesting recently-updated tools here:
www.dell.com/support/kbdoc/en-us/000126750/dell-client-command-suite
HP Support Assistant is the oft-default tool, not suitable for automation; but there is the HP Image Assistant:
ftp.ext.hp.com/pub/caps-softpaq/cmit/HPIA.html
So far this looks like the way forward. Early testing done, not thorough yet. It has a GUI for default use, but also has command line usage. Download the installer, complete it, CD to the folder it created in command-line, and run HPImageAssistant.exe for nice GUI. Documentation is here:
ftp.hp.com/pub/caps-softpaq/cmit/imagepal/userguide/936944-008.pdf
Several command-line examples are in that PDF. This command does a lot of very good things, very silently:
.\HPImageAssistant /Operation:Analyze /Category:All,Accessories /selection:All /action:Install /silent /reportFolder:c:\HPIA\Report /softpaqdownloadfolder:c:\HPIA\download
This one works very well indeed. It does need a bit more technical intervention:
A very interesting .EXE which appears to be able to upgrade Build 1909 directly to 22H2.
We have machines that we want kept on Windows 10, we don’t want users urged over and over again to upgrade to 11. Run this Powershell, reboot (probably), and we’re good:
# Exit script if this is not Windows 10
If ((Get-ComputerInfo | Select OSName).OSName -notlike "Microsoft Windows 10*")
	{
	"This is not Windows 10. Exiting..."
	Exit
	}
# Proceed
Set-Location -Path HKLM:\SOFTWARE\Policies\Microsoft\Windows
If (-Not (Test-Path -Path WindowsUpdate)) { MKDIR WindowsUpdate }
Set-Location -Path HKLM:\SOFTWARE\Policies\Microsoft\Windows\WindowsUpdate
New-ItemProperty -Path . -Name "ProductVersion" -Value "Windows 10"
"Done!"
Note that many so-called solutions out there set things so no further updates, including Windows 10 build upgrades, will happen at all. The above simply limits things to Windows 10.
There are only three methods for Windows, which appear to work reliably for Adobe Reader DC (among many others) at this time:
This method uses Powershell module PsWindowsUpdate.
[Net.ServicePointManager]::SecurityProtocol = [Net.SecurityProtocolType]::Tls12
Set-Executionpolicy RemoteSigned -Scope Process -Force
Install-PackageProvider -Name NuGet -Force -ErrorAction 'SilentlyContinue' > $null
Set-PSRepository -Name PSGallery -InstallationPolicy Trusted
If (Get-InstalledModule -Name PsWindowsUpdate -ErrorAction 'SilentlyContinue') {
	Update-Module -Name PSWindowsUpdate -Force
} Else {
	Install-Module -Name PSWindowsUpdate -Force
}
Import-Module PSWindowsUpdate
Get-WindowsUpdate
Install-WindowsUpdate -NotCategory "Drivers","Service Packs","FeaturePacks" -NotTitle "preview" -AcceptAll
And to do it while ignoring reboot:
Install-WindowsUpdate -NotCategory "Drivers","Service Packs","FeaturePacks" -NotTitle "preview" -AcceptAll -IgnoreReboot
The -IgnoreReboot ignores all relevant reboot automata. -NotTitle "preview" omits all updates with the word “preview” in their name.
But sometimes, e.g. with a new PC install, we’ll want to install all updates and reboot automatically:
Install-WindowsUpdate -AcceptAll -AutoReboot
Install-WindowsUpdate -NotKBArticleID KB1234567 -AcceptAll
Install-WindowsUpdate -NotKBArticleID KB1234567 -AcceptAll -IgnoreReboot
Install-WindowsUpdate -AcceptAll -NotKBArticleID "KB1234567,KB7654321"
-NotTitle and -NotUpdateID.Reset-WUComponents
Get-Command -Module PSWindowsUpdate
Get-Help works for all of them.
This scenario is common, though not necessarily obviously so:
DISM /Online /Cleanup-Image /RestoreHealth) won’t fix it, it reports needed data not available./Source:...INSTALL.WIM, where INSTALL.WIM resides on a mounted ISO of that Windows, even a freshly downloaded ISO, still fails due to needed data not available.The fact is that #3 above occurs because freshly downloaded ISOs lack many Windows updates. This is not quickly resolvable, but it is very resolvable given some time. Using this method, we will fix corrupt Windows images. You’ll need many gigabytes of disk space to work with.
So. The first step is to decide which Windows version we’re going to create an up-to-date INSTALL.WIM for, to be used by DISM. For this example we’ll say 64-bit Windows Server 2016. The ISO can be had (at this writing) at this page.
Download that ISO, and unpack it. In the SOURCES folder at the root, there is a large file called INSTALL.WIM, 5.6 gigs at this writing. Create folder D:\Server2016WIM (or whatever works for you) and move that WIM into it.
You will need to go to the Properties of the INSTALL.WIM file, and uncheck “Read-Only”, for some reason.
Now we need a tool called wsusoffline. It downloads the updates which we are going to put in that INSTALL.WIM file. It comes from www.wsusoffline.net. Unpack the zip file and run UpdateGenerator.exe. Set it up like this:
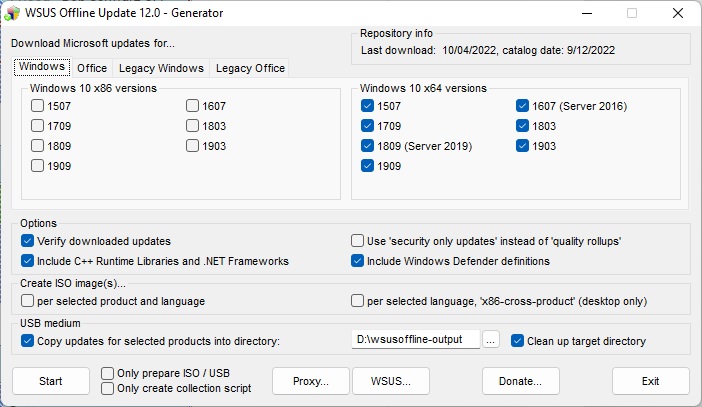
Make sure the “USB medium” target directory is useful and handy, We’re not using USB for this, just a different folder on the same drive that the WIM is in. Click Start, and it will download, verify, and store a whole lot of Windows updates in that folder. The above setup does make a repository for every 64-bit Windows 10-class OS, including Server 2016 and 2019. 2022 isn’t available here yet, we can expect it to be in the next edition of wsusoffline.
Once that download is done, we need to see which install(s) are in that WIM file. We do this thusly:
CD \SERVER2016WIM
DISM /Get-WimInfo /wimFile:install.wim
In the ISO I just downloaded, there are four installs, Server 2016 Standard without (1) and with (2) GUI, and Server 2016 Datacenter without (3) and with (4). Because our server to be repaired is not bare-bones, we want to update 2 and 4 just in case. So we prepare,
D:
CD \SERVER2016WIM
MKDIR Mounted-WIM
and mount the WIM in index 2:
DISM /Mount-WIM /WimFile:INSTALL.WIM /index:2 /MountDir:Mounted-WIM
The above will take a little while. We study D:\wsusoffline-output (see the wsusoffline image above), and we find that the Windows 10-class updates are here:
D:\wsusoffline-output\w100-x64\glb
So when the mount is done, we run the updates, still with current directory as above:
DISM /image:Mounted-Wim /Add-Package /PackagePath:D:\wsusoffline-output\w100-x64\glb
and a lot of nonapplicable updates are reported as errors, and a lot of successful updates are also reported, in a long report stream. This happens because every patch for every build of 10, 2016, and 2019 are all in that one folder. DISM knows which ones it needs, and will report success for those. But it often does not get them all on the first pass. So it can be helpful to run it again. Successful DISM fixes have been had without the second run, and the second run does take time, but the second is necessary for full completion.
Then we unmount and commit the changes:
DISM /Unmount-Wim /MountDir:Mounted-Wim /Commit
And it’s done! That WIM is ready to be used to de-corrupt a Server 2016 machine. We just have to get that file (6.5 gigabytes just now) onto a folder on the server or a network share, make that folder or share the current directory, and run:
DISM /Online /Cleanup-Image /RestoreHealth /Source:wim:Install.wim:2 /limitaccess
That’s index 2, index 4 may be needed if servers have roles only found in Datacenter. And after the DISM, some machines will need SFC /SCANNOW, because although DISM will bring in the needed items, it will not always put them everywhere they are needed.
If power is lost during the WIM procedures, you will probably have to run a cleanup and start over again. Check thus:
dism /get-MountedWiminfo
and cleanup thus:
dism /cleanup-wim
Reportedly, you may need to run those more than once. You may also have to delete subkeys in the registry here:
\HKEY_LOCAL_MACHINE\SOFTWARE\Microsoft\WIMMount\Mounted Images
and reboot, and then delete and recreate the folder Mounted-WIM.